Wednesday, February 22, 2017

Closet Remodel

"Pinspiration" is such a dangerous word lately. I get caught up in so many projects that all I think are a good idea! For the most part they are great ideas but they are certainly time consuming, especially when you're 5 months pregnant.

When we first moved into our house I knew I would need to fix our closet. It just wasn't utilizing all the space it had... and I have a ton of clothes.


So, I used the 3 closets in our house for all of my stuff. LOL! But, with a baby on the way I needed to clean out the closets and consolidate. GOOD NEWS!! I was able to sell some items on Poshmark and pay for half the closet remodel and get rid of some clothes. The rest I'm going to donate.

I found this blog post on Pinterest and felt like it was a simple weekend project that my mom and I could do. 

I was a bit wrong on that. This project took forever (2 1/2 weekends) and it was exhausting. BUT, I think, in the end, it was worth it. (Don't worry! Not all of my shoes are in the closet yet)


Seriously though, on what planet are these closet racks convenient or pretty? I can't stand them and they're just not useful.


First, we measured and bought the wood. I asked for help at the home improvement store and ended up getting the wrong stuff. But, after spending the money and painting the wood, there was no turning back. So we made do.


I'm torn on if painting the wood first is a good idea. I did some of it and it ended up getting so dirty after we worked with it that I had to paint it again. So, there's that.

We added all the 1x5 board to the walls. We had trouble with studs so this is where it became a pain. That and my wood was thicker so it became harder to screw in. The 1x5 is what starts the shelving and what will hold your clothes. So make sure it's attached to studs.

Then, we added the 1x12 (yes, I bought the right wood here LOL) to build some of the shelves. We nailed it in to keep it secure.

You may notice my husband's side of the closet is higher than mine. His clothes are longer so I wanted to make sure he had room. It's a bit close so make sure you measure where you want your clothes to go first.


The shelves were pretty easy. (I'll add baskets later.) Cut the wood and nail it in. Always make sure  you're taking good measurements. Most of this needs to be precise.

My closet measurements were a bit different then the blogger I followed. So, we had to get the expandable rods to hang the clothes. I don't think that changed anything but just something to keep in mind.


Then we started the shoe rack. 


We decided to get a nail gun for the shoe rack and we did things a little different. We cut the wood and cut a small piece out at the bottom to it would sit flush against the wall. So, essentially, our baseboards didn't get in the way.

Then, we attached it to the wall. With a baby on the way I just didn't want to risk it. I did the shelves about 6.5in apart except for the bottom. I'm going to get a cute laundry basket to go here. And on the top I wanted some room for boots.


I painted the wood that I didn't paint first. It really wasn't that hard but it was kind of pain. Let it dry for 3-4 days and then started putting things in place! It looks kind of uneven in this picture but I everything was level.

Then, we just added our the top bar for our clothes! Hmm.. I guess I actually made this sound easy.


Thursday, June 16, 2016

It's all for One Pulse

I've been in news for about 6 years. It's fair to say I've covered my fair share of horrific stories. Murders, fatal accidents, fires, you name it, I've probably covered it. 

It's hard but it gets easier. Sadly, I've covered mass shootings and terror attacks, as well. I truthfully never thought I would have to cover one in my own back yard and now I've covered two. 

Two. That number is hard to swallow. 

When a terror attack hit Chattanooga I was live on the air. My heart sunk but I went into news mode and told our viewers exactly what we knew and what happened. 

That same thing happened on Sunday morning, except I was behind the scenes producing our weekend morning newscasts. 

I remember seeing the tweets come in. I remember seeing the Facebook post on Pulse's Facebook page. "Everyone get out of Pulse and keep running." I thought to myself, what in the heck is going on? Why would anyone go on a rampage at Pulse?

Here's some back story. I went to college at the University of Central Florida in Orlando. I have been to Pulse many, many times. Yes, it's a gay club. But, at Pulse and any gay club, you can find straight people just trying to have a good time with some friends. I have some wonderful memories with some great people at Pulse. I can remember dancing and laughing so vividly. I remember smiling and being happy. No one ever turned down a Pulse night. You were guaranteed a good time. 

And then there was the morning of June 12th. My twitter feed was flooded with retweets and messages from those in Orlando. The stories, the fear.. I couldn't understand what was happening. 

It was getting to be 5am and we found out there were hostages. I still couldn't fathom why anyone would do this. Was this a hate crime? Why Pulse? Why Orlando?

A while later we started to hear the extent of this shooting. The shooter was dead and Orlando police called it a "mass casualty situation."

My heart just broke. I continued to write the news and frantically tried to cover this breaking news story. But, in reality, I wanted to cry. But I had a job to do and this community needed me to do it. 

Police couldn't do a press conference.. that indicated to me there was an issue. That was a scary tweet from OPD. This situation was serious. What was happening? Are my friends ok? My brother doesn't live far from here and there was speculation there could be someone on the run (we later found out this wasn't true). Is he ok? Is he in danger? So many thoughts just going through my brain. 

Then, we found out this was a terror attack. I was in shock... but I had news to fill and stories to write. I remember frantically writing every little thing I could. I remember seeing this mom on GMA just terrified that her son could be dead. I recognized the last name but didn't know how. How is this happening in a place I lived for 5 years? A place I'm so familiar with. I wanted to cry, my heart broke for this woman. Her son is missing. Who else is missing?

We continued to learn more details about this horrific morning as the day went on. It took about 24 hours before we learned who the victims were. But, we knew the shooter and all the hatred he was capable of. The evil that was inside him to shoot 49 people inside a club. It hurt. Bad. 

After my 14 hour day, I drove my 30 minutes home. I drove my 30 minute drive, thankful that everyone I knew was alive and well. But, I still was hurt. My heart broke. The gay community is tight knit in Orlando. Chances are you know someone, who knows someone, etc. Some of the nicest people I've ever met. Some of the best friend I ever made. This could've been them. 

But, instead it was 49 innocent people. 49 people who were trying to dance, laugh and have a good time. They were embracing those memories I once shared in that same club 7 or 8 years ago. The stories are tragic. The stories hurt. They may leave you broken. 

I understand why so many people think journalists are heartless. We show up on your tv screen and tell you the facts. There's little emotion. But, I can tell you that each one of us had emotion that day. There are tears behind the scenes, there is anger and disbelief. Many stations even provide grief counselors to help us deal with this pain. 

Covering tragic events isn't easy. It especially isn't easy when it hits home. When you can relate to every one of the 49 victims that were so brutally murdered. 

But then, then came the positive stories. The THOUSANDS of people who showed up just hours later to donate blood. The first responders and their heroism. The surgeons and nurses. The list goes on and it should. The acts of love is what makes Orlando, Orlando. The businesses that donated food, water and time. I was in awe. The story didn't shift, it didn't change. But these stories did make a difference. 

We know what happened. We know a terrorist walked into a club and killed 49 people in the name of ISIS. 

But, to me, what matters is everything but that. The victims, the heroes. I wish we could put politics aside and remember these victims and honor the heroes. 

They deserve that, at least for now. The debate on gun laws will always be there. Let us lay these 49 people to rest and let us mourn.

We need to mourn. We need to grieve. Because we're hurt. But all the love.. the love we've received from around the world, brings us just one step closer to healing. 

(picture from NBCnews.com)


Tuesday, April 19, 2016

Something old, something new

Ok, this project was a daunting task for a novice. 

But, I fell in love with a dining room table at a local thrift shop. It has perched up in a corner, no legs attached and was just calling my name. 

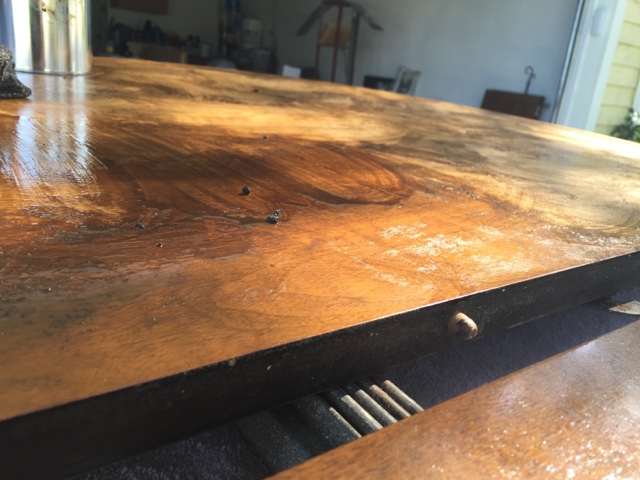
This particular happened to be 50% off that day. So I got a dresser for $30 and this table for $75. But, there was a major problem. It looked like this. 


Yikes, right? 

Yeah, mom and I thought we could use some product to take that green fuzzy stuff right off. Well, after a ton of product... We failed. I was so devastated. We were going to have to remove the finish. Boo!! 

So, some more Formby's it is. It was heartbreaking for me but I was now determined to make it beautiful again. 

I'm not going to lie... It took A LOT of Formby's. This project was so tough. 


It just kept spreading and spreading. Ugh so gross. 


After it drying and some sanding. We could sand it. Initially, we tried the stain with the polyurethane in it and it just wasn't working. It was a Honey color and it added nothing. So, add in some more sanding and the espresso stain and we were golden. 3 coats later and this is the top of my beautiful table. 


Yay! So a few coats of polyurethane and we were ready to paint. You'll see why in a minute. 

I ended up buying a paint sprayer to make my life easier. And yes, it was so much easier. Well worth it. 

I sprayed the bottom of the table and the legs. And here's the finished product!


It comes with two leaves so we can add more seating. I'm so proud of this table. 

I would say we probably spent $150 on the table and products. $200 at best. A few weekends of hard labor and we have a beautiful dining table. 

Items like these make rehabbing worth it!

Pics of chair rehab coming soon :)


Saturday, April 16, 2016

Revamping the 1950s

When I think of design for our new house.. 1950s certainly isn't the style I was going for. We're not extremely modern people either but our style is probably more modern with a shabby chic touch? I don't know, I've never been very good at identifying my style.

I like everything. LOL

So, it did make furniture shopping hard. We were looking for solid wood pieces that we could stain or paint and make it match my husband's current dresser. 


We found this piece at one of our local Salvation Army's. It must've been there for a while because the manager let it go for $40. STEAL! The bumps in the paint were not there when we bought it. 

That's a paint remover. Forby's makes a Paint remover for furniture. We used that here to remove the paint. Terrible process but it works well. 


So, basically you paint this liquid on and let it set for 15 minutes or so. Then, you scrape it off. LOOK AT THAT WOOD!! I was so excited to see how beautiful it was underneath. 


Next-- the sanding. I have a love/hate relationship with sanding and for multiple different reasons. This project wasn't so bad. We used an 80 grit sand paper and removed what was left of the paint and made it smooth. We did uncover some issues on the bottom of the furniture. We had to replace it with this really, really thin wood (I can't think of what it's called but we got it at Woodcraft). It was simple. Glue and stick. 

The wood was so beautiful that we decided to stain the piece. We started with an Espresso color and didn't get the look I wanted. So, in the end we went with Ebony. 


Next, we polyurethaned the entire thing. 2-3 coats and called it a day. 

The whole project took probably 3 weekends total. Granted, I'm not spending all day every weekend of them but it still was a hassle. I would do some things during the week before work but still.. it took a while. If you ever use Formby's or a similar product.. GET GOOD GLOVES! That stuff does not feel good when it gets on your skin. 


We also bought new hardware. It looks similar to the old but it's a brushed metal rather than a gold and more square. This piece is probably is one of my favorites. I'm really proud of it. It was a lot of work but in the end.. it turned something that was old and dingy into something beautiful again. 

So, you may be wondering where am I getting the 1950s from this? Well.. we had to take the mirror off of its plastic pieces and there was a stamp on the back. Dated 1949. 

Do they even make furniture that will last that long anymore? I hope it will last for many more years! 

Thursday, April 14, 2016

Making old furniture new again

Let me say, I never thought I'd be good at this. But, I had some leftover cash and mom and I headed out to thrift stores, flea markets and garage sales. 

I'm not the best at seeing what things can be. I see it, think it's ugly, and move on. But, it's amazing what so paint or stain can do. 

I've also never used chalk paint. I know everyone raves about it and such but I'm a big fan of Valspar Furniture Paint. It's expensive but works fabulous. 


This was our starting project for the nightstands. We had been using old IKEA tables and I was ready for something new. We found these at a Hotel Liquidation Warehouse. They were more than I wanted to spend but they were exactly what I was looking for. 

I removed the drawer and door, along with the hardware. Lightly sanded it and began painting. 


2 counts of paint later and this is what we have! 


I bought some cheap black satin spray paint to do the inside.. Because who's really going to see that? It matches my husband's dresser almost perfect. 

This was by far the easiest of my projects and still took me a solid two days two compete. We let both of them dry for a week before we brought them inside.

We used probably half a quart (I think) of paint and a full can of spray paint. 

I'd say we came out with two nightstands for under $100! 


Reporter turned furniture flipper?!?


Ok, not really but it's been an adventure lately. 

Buying a house is taxing and you always feel like there's something that needs to be done... Especially when you buy a fixer upper. But honestly, we just can't afford to spend thousands on furniture. 

I'm back at work (Yay) full time and my life has never been crazier. I'm currently producing and I've really been enjoying my time off-air. 

However, I really wish we would've bought a house when I didn't have a job so I had time to do every project! Although, we would've been more broke! lol!

So back to my furniture flipping experience. Mom and I went thrift store shopping one weekend hoping to find a few things. I'm new to this but mom's a pro. (Why is she such a pro at everything?) So, she was able to steer me in the right direction and find all wood furniture. 

Everyone raves about chalk paint and maybe we'll do that some day but for now, we're going the old fashioned way. Sanding, removing pint... All the miserable stuff. 

Here's what we bought! 


The light colored nightstands came from a hotel liquidation warehouse. $40 each. Not the best deal but it was pretty much what I wanted. A drawer and cabinet to hide our crap!

The white chest is from 1949. It says so on the mirror. It came from the Salvation Army for $40, maybe $50. I can't remember. I forgot to take a picture before I started removing the paint but it wasn't pretty even before that lol

We also bought this beautiful table. Someone put the cover on it when it was wet and left all this fuzzy stuff on it. We paid $70 but it was originally priced at $275 from a little thrift store. 

Not pictured. We picked up a teal dresser for the guest room. $30, I think. Silly me forgot the before picture. 

I would say that was a pretty successful trip! To be honest, I doubted myself a lot. Looking at all this furniture in our garage... I just wasn't sure I could do it. I'm not crafty but I was determined. 

Next post... What the finished product looks like! 


Monday, February 29, 2016

Buying a house.. Then the fun begins

So you find the perfect house. You agree on a price and then... It's a whirlwind. 

Inspections, appraisals. Anything can really go wrong. Thankfully, the only thing went wrong for us was the A/C and the seller agreed to pay half. We had a guy out 2 days after we purchased and our A/C was fixed. (We're lucky it was a cooler winter in Florida.)

So then begins the painting. What a pain. Whatever they used on the walls to begin with made it worse. We're still unsure what it is. It's been 3 months and I have still have touching up to do ;) Thanks to our parents for the countless hours of painting :)

We replaced the UGLY baseboards (why didn't I take a picture of those) with new ones. 

Pretty much everything around this house was done cheaply and poorly so we're having to really do a lot more than we anticipated.

But, it's been worth it so far. 

Here's some pics: